On this page
Migration to PoS User Guide
These instructions are exclusively for users interested in using Nimiq’s Migration Tools to register their validator and actively transition from Nimiq PoW to PoS. If you wish to become a validator post-migration instead, please refer to this documentation. For a complete understanding of the migration technicalities, refer to this document.
The migration to PoS will undergo a test run. The phases of this test run are as follows:
| Event | Day and Time (UTC) | Block Height |
|---|---|---|
| Registration Start | Sunday, April 14th, 00:00 | 3016530 |
| Registration End | Thursday, April 18th, 00:00 | 3022290 |
| Pre-stake Start | Friday, April 19th, 00:00 | 3023730 |
| Pre-stake End | Monday, April 22nd, 00:00 | 3028050 |
| Block Candidate | Monday, April 22nd, 18:00 | 3029130 |
Validator Registration Tool
The Validator Registration tool facilitates the pre-registration process for validators, so they are included in the PoS genesis block. Validators pre-register within the PoW chain. The Validator Registration tool operates in two distinct modes:
- Keys and corresponding address generation
- Validator registration via transactions
First, you need to clone the Nimiq Validator Registration Tool repository and install its dependencies by executing yarn inside the repository.
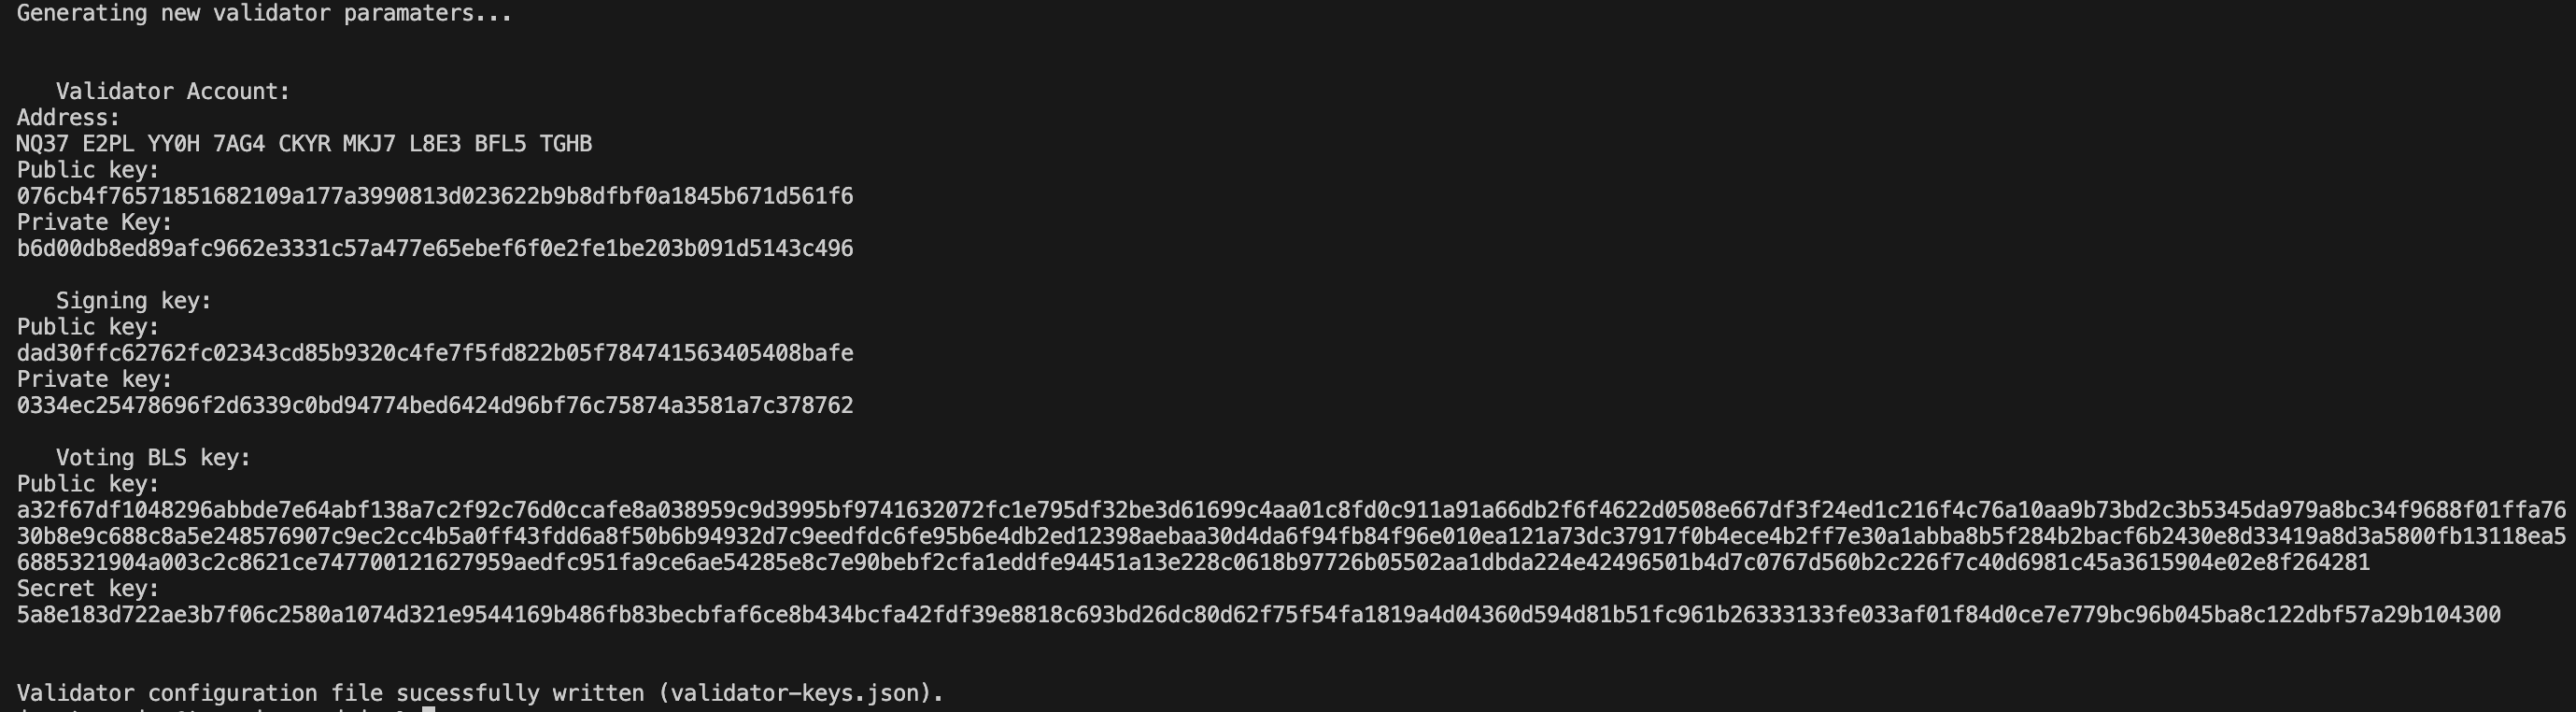
Step 1: Generate validator keys
Execute the tool without parameters to generate a validator address, signing key, and voting key:
shell
node validator-registration.jsThe tool generates fresh keys and stores them into the validator-keys.json file in your current directory. The following screenshot demonstrates an example output of the script:
tip
Save the private keys securely, especially the validator private key! There is no recovery mechanism for lost private keys. Once lost, access to your validator and related NIM may be permanently lost.
Using your own keys
You can of course also generate your validator, signing and/or voting keys yourself through other methods. Just replace the address and keys in the validator-keys.json file with the ones your have and continue with the next step.
Step 2: Fund your validator address
To start the validator registration process, fund the validator address you just generated to cover the nominal transaction fees of 1 Luna each (you need at least 6 Lunas = 0.00006 NIM) associated with the validator registration process. Additionally, you will need to pay the readiness transaction, so you need to fund your address with 10 Lunas for the registration and activation transactions. You can use any wallet to send Lunas to this address.
info
You will need funds to pay for the validator registration transactions and for the deposit for your validator. If you don't have funds for these transactions, please use the Testnet Faucet to request NIM for the test-run.
Step 3: Run the validator registration tool
For testing this in the PoW testnet, you must specify the arguments as follows:
shell
node validator-registration.js --validator validator-keys.json --network testThe tool will connect to the Nimiq PoW testnet chain. Upon consensus, the tool creates and signs the validator registration transactions and sends them to the network, effectively registering your validator. Note that these transactions are a bundle of 6, and each one has a nominal fee of 1 Luna. Please ensure you have funded your validator address — as instructed in the previous step — as the transaction fees are paid from this address.
For detailed guidance through the scripts and their options, run node validator-registration.js --help. This will print out the usage instructions.
Step 4: Deposit payment and commit
The final step involves committing to the registration and paying the validator's deposit of 100 000 NIM. This transaction can be sent from any address. Irrespective of the address you send the deposit from, you must include your validator address in the transaction’s “public message” field so your deposit can later be matched to your validator. Please include your validator address in human-readable format (NQ...).
To send the transaction manually via the Nimiq Wallet, you need the following data:
| Recipient Address | NQ07 0000 0000 0000 0000 0000 0000 0000 0000 |
| Value | 100000 NIM or more |
| Public Message | Your validator address in human-readable format (starting with NQ) |
warning
Please note that any value below 100 000 NIM will result in permanent loss. Any amount above 100 000 NIM will be assigned as stake as long as the difference is greater than the minimum stake (100 NIM); otherwise, the excess will be burned.
Validator Activation Tool
The Activation tool facilitates the transition from the PoW chain to the PoS chain. Keep in mind that this tool can only be executed once the pre-stake phase is concluded, specifically during the activation phase.
- Clone and compile the PoS blockchain repository and follow the instructions.
- Enable the RPC server in the PoW chain. Follow the instructions in this sample guide.
Step 1: Add your Validator Data into the Configuration File
Once you have your client setup, you can either:
- Go to the file
$HOME/.nimiq/client.toml, which includes a dedicated validator section at the end, and paste your validator data into this section. - Refer to this guide.
Ensure that you set your sync_mode as full or history in the consensus part of the configuration file. Only full or history nodes are eligible to be validators.
Step 2: Run the Activation Tool
The Activation tool establishes a connection with the PoW chain via RPC, extracting data from your configuration file and crosschecking it with the information in the JSON file within the PoW chain.
To execute the tool successfully, you need to ensure that you are fully synced and in consensus within the PoW chain. This requires starting the PoW client with an RPC server enabled on your imported validator address (this might take a while). As in this example, you can do it in your configuration file by adding your address and key pair.
You can start the RPC server by cloning the Nimiq CoreJS repository then following the quickstart instructions and finally running the following command:
shell
node clients/nodejs/index.js --dumb --network=test --rpc=8648 --wallet-seed=private_keypublic_keyBefore executing the activation tool, make sure you run cargo build --release within the PoS repository to compile the code.
Once you are in consensus in the PoW chain, proceed to execute the migration tool by running the following command in the PoS chain, including the path to the configuration file containing your validator data and specifying the RPC server to be used:
shell
cargo run --release --bin nimiq-pow-migration --url "url-according-your-configuration" --config client.tomlAfter launching the tool, the readiness transaction will be automatically sent to the network. During a span of blocks, the tool will monitor for readiness transactions. At the defined candidate block, if the tool counts 80% of readiness, the migration process starts and once it is done, it will automatically start the PoS client.